> ## Documentation Index
> Fetch the complete documentation index at: https://wisdomai-add-trigger-agent-api.mintlify.site/llms.txt
> Use this file to discover all available pages before exploring further.
# Row Level Access Control
Row-Level Access Control (RLAC), often referred to as Row-Level Security (RLS), is a data security feature that allows for granular control over data access within the platform. Instead of simply granting or denying access to an entire table or column, **RLAC enables administrators to define policies that restrict which specific rows of data a user or group can view or manipulate**. The security logic is applied directly at the data source, meaning that no matter how the data is accessed (e.g., through a dashboard, report, or direct query), the row-level filters are enforced automatically.
## Set Up Row-Level Authorization
The setup process involves two key steps:
1. [**Configure an index table:**](#configure-an-index-table) Think of this as your master permission list.
* **Email column:** Select the column that contains the email addresses of your users. This is used to identify who is currently logged in.
* **Internal ID column:** Select the column that will act as the "key" to unlock data (e.g., a `UserID`, `GroupID`, or `RegionID`).
2. [**Configure a filtered table:**](#configure-a-filtered-table) This is the actual data you want to restrict.
* **Index Table:** Choose the master permission list (index table) you just configured.
* **Internal ID column:** Select the column in this table whose values will be matched against the "key" from your index table. This ensures users only see rows that correspond to their ID.
### Configure an Index Table
First, designate a table to act as the master list that maps your users to the data they are allowed to see; i.e.: configure the Index Table.
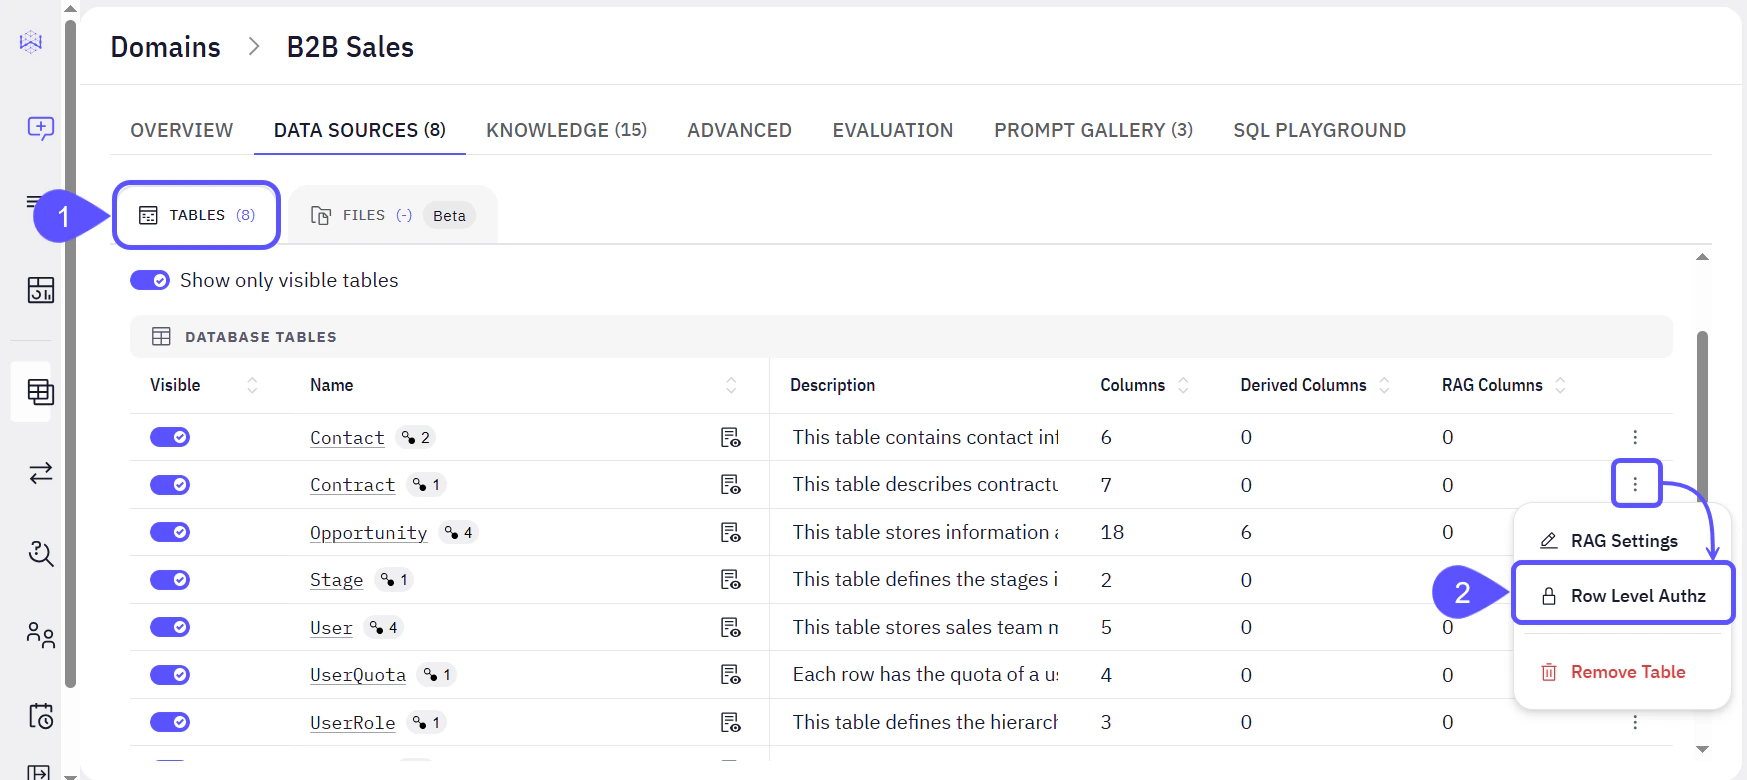
1. Within the selected Domain, Navigate to the **Data Sources** tab > **Tables**.
2. On the row you want to manage access control, click the three-dot menu next to the desired table, and select **Row Level Authz**.
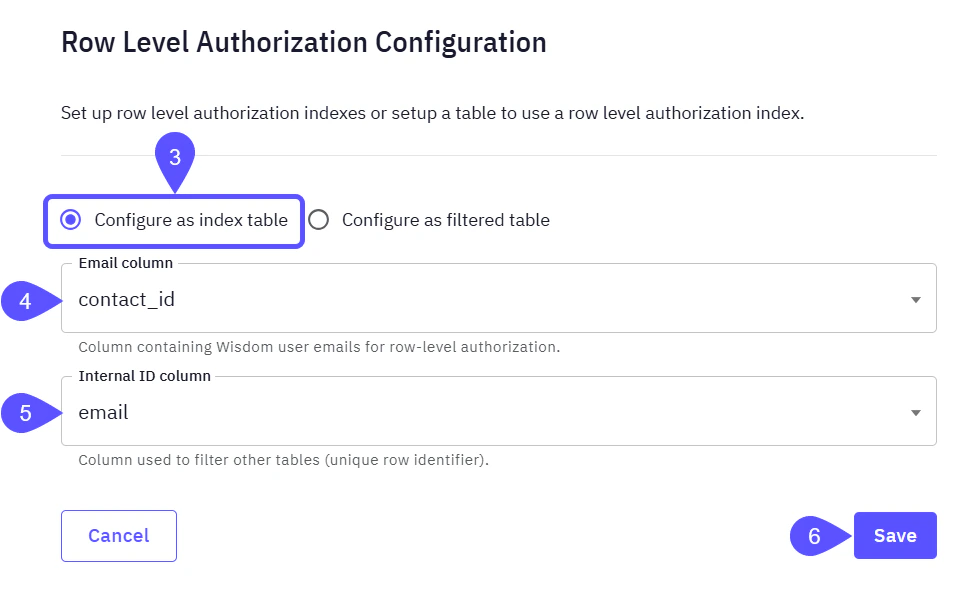
 3. In the modal that opens, choose the **Configure as index table** option to create the master permission list.
4. Set the **Email column** to the column that contains user emails for row-level authorization.
5. Set the **Internal ID column** to the column with the unique identifier used to filter other tables.
6. Click on **Save** to keep your changes.
3. In the modal that opens, choose the **Configure as index table** option to create the master permission list.
4. Set the **Email column** to the column that contains user emails for row-level authorization.
5. Set the **Internal ID column** to the column with the unique identifier used to filter other tables.
6. Click on **Save** to keep your changes.
 ### Configure a Filtered Table
Next, apply this configuration by selecting the created Index table and the internal column that these users will have access to; i.e.: set up the Filtered table.
1. For the data table you want to restrict, open its **Row Level Authz** settings (as shown in steps 1 and 2 before).
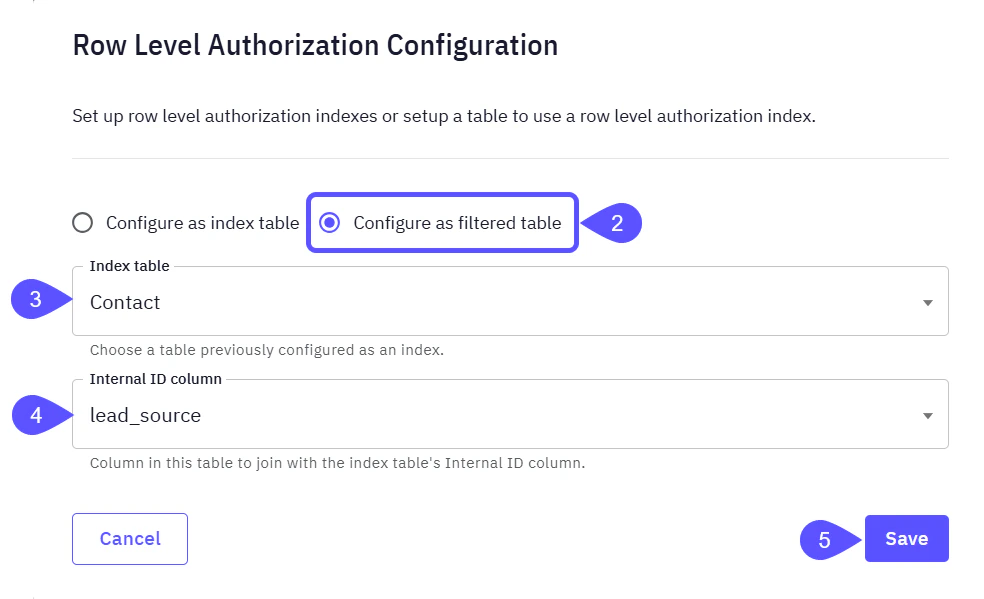
2. In the modal window that opens, choose the **configure** **as a filtered table** option.
3. From the dropdown menu, select the **Index Table** you have previously configured.
4. Select the **Internal Column** that will join with the Index Table’s Internal Column.
5. Click on **Save** to keep your changes.
### Configure a Filtered Table
Next, apply this configuration by selecting the created Index table and the internal column that these users will have access to; i.e.: set up the Filtered table.
1. For the data table you want to restrict, open its **Row Level Authz** settings (as shown in steps 1 and 2 before).
2. In the modal window that opens, choose the **configure** **as a filtered table** option.
3. From the dropdown menu, select the **Index Table** you have previously configured.
4. Select the **Internal Column** that will join with the Index Table’s Internal Column.
5. Click on **Save** to keep your changes.
 ## Key Considerations
* **Data Admins** bypass all restrictions and can view all data, while **Explorers** will always see filtered views.
* The system works best when user emails in your data match Wisdom user emails, though it can handle some variations.
* For filtering to work, the index table and filtered tables must be joinable on their respective ID columns.
* The table embedded RAG solution is not currently filtered by RLA, meaning all users may see all indexed results.
## Next Steps
* [Users Management](/manage-account/access-management/users-management)
* [Supported Data Sources](/getting-started/supported-data-sources)
* [How WisdomAI Works](/getting-started/how-wisdom-ai-works)
* [Basic Tutorial Connect and Test](/setting-up-wisdom-ai/basic-tutorial-connect-and-test)
## Key Considerations
* **Data Admins** bypass all restrictions and can view all data, while **Explorers** will always see filtered views.
* The system works best when user emails in your data match Wisdom user emails, though it can handle some variations.
* For filtering to work, the index table and filtered tables must be joinable on their respective ID columns.
* The table embedded RAG solution is not currently filtered by RLA, meaning all users may see all indexed results.
## Next Steps
* [Users Management](/manage-account/access-management/users-management)
* [Supported Data Sources](/getting-started/supported-data-sources)
* [How WisdomAI Works](/getting-started/how-wisdom-ai-works)
* [Basic Tutorial Connect and Test](/setting-up-wisdom-ai/basic-tutorial-connect-and-test)