> ## Documentation Index
> Fetch the complete documentation index at: https://wisdomai-add-trigger-agent-api.mintlify.site/llms.txt
> Use this file to discover all available pages before exploring further.
# Create an Agent
Get started by creating your first Agent to keep track of important business metrics automatically. This tutorial will show you how to monitor a key metric, run a follow-up analysis when a condition is met, and send notifications to your team.
1. This guide uses sales monitoring scenarios, but you can apply these steps to any metric you need to watch.
2. The Agents feature is currently in beta.
## Before you Begin
Make sure you have the following:
* **Access to WisdomAI**: You need an active account to access the Agents feature.
* **A Goal in Mind**: Know which business metric you want to monitor (e.g., sales, user sign-ups, error rates).
* **(Optional) Slack Integration**: If you want to send alerts to a Slack channel, an administrator must first connect your Slack workspace to WisdomAI.
Read the [Slack](https://docs.askwisdom.ai/integrations/connect-to-slack) guide to learn how to do it.
## Create an Agent
To create a new agent, follow these steps:
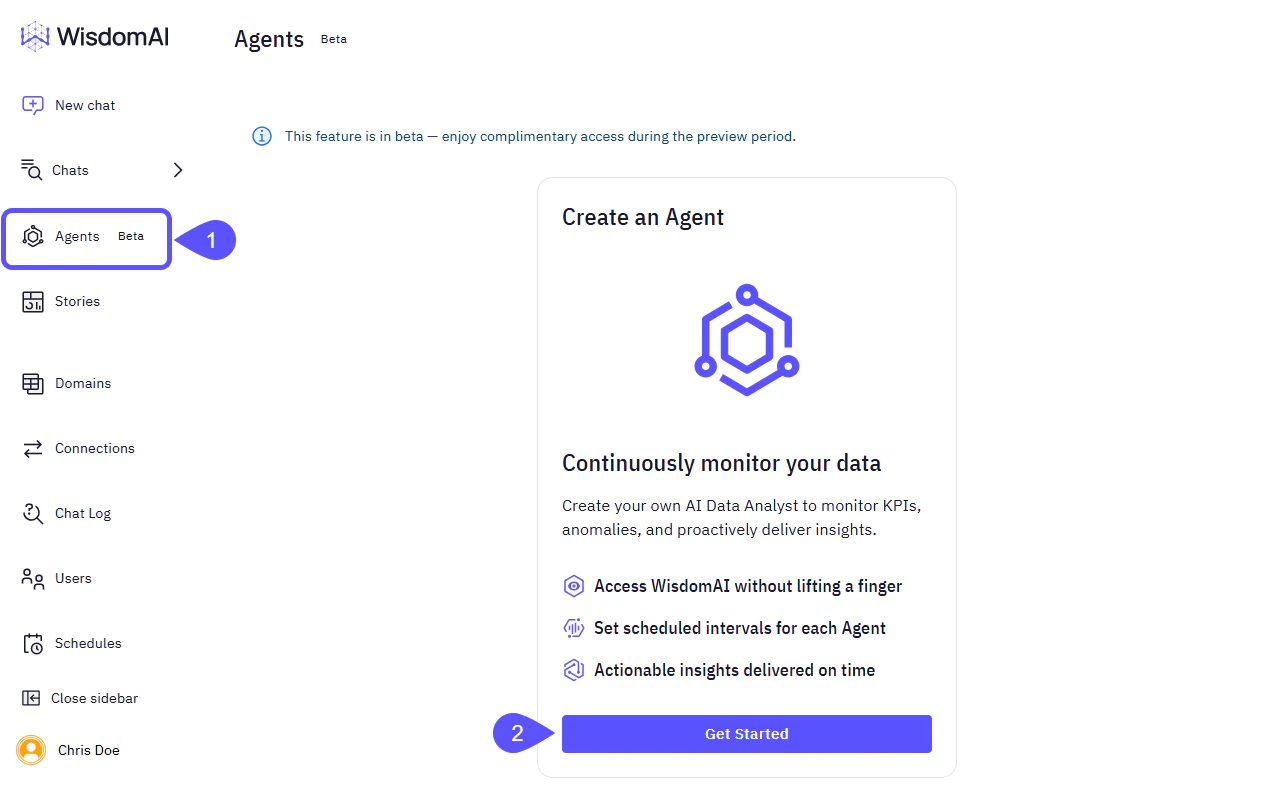
1. From the sidebar on the left, select the **Agents** tab.
2. If no agents have been configured, you will see a welcome screen. Click **Get started**.
 3. **Select a Domain**: Choose the data domain the Agent will run in.
4. **Agent Name**: Provide a descriptive name for your Agent to easily identify it later.

5. Configure the **Activation** **Trigger**. The optional trigger allows you to choose between two modes of operation: scheduled reporting or conditional monitoring.
1. **Trigger Disabled (Scheduled Reporting)**: Leave the trigger disabled to use the Agent for scheduled reporting. In this mode, the analysis will always run and send out a notification according to the schedule you set.
2. **Trigger Enabled (Conditional Monitoring)**: Enable the trigger to use the Agent as a monitor for specific conditions. In this mode, an analysis and notification are sent only if the trigger's conditions are satisfied.
* In the text box, describe the condition. You can write complex criteria. For example: `If total sales in the last year fall below $100,000`.
* Click **Test** to check if your trigger condition is currently met. This helps you verify that the criteria works as expected. Learn more in the [Test an Agent During Configuration](#test-an-agent-during-configuration) section of this tutorial.
Start with simple, single-condition triggers to ensure they work as expected before creating more complex ones.
3. **Select a Domain**: Choose the data domain the Agent will run in.
4. **Agent Name**: Provide a descriptive name for your Agent to easily identify it later.
5. Configure the **Activation** **Trigger**. The optional trigger allows you to choose between two modes of operation: scheduled reporting or conditional monitoring.
1. **Trigger Disabled (Scheduled Reporting)**: Leave the trigger disabled to use the Agent for scheduled reporting. In this mode, the analysis will always run and send out a notification according to the schedule you set.
2. **Trigger Enabled (Conditional Monitoring)**: Enable the trigger to use the Agent as a monitor for specific conditions. In this mode, an analysis and notification are sent only if the trigger's conditions are satisfied.
* In the text box, describe the condition. You can write complex criteria. For example: `If total sales in the last year fall below $100,000`.
* Click **Test** to check if your trigger condition is currently met. This helps you verify that the criteria works as expected. Learn more in the [Test an Agent During Configuration](#test-an-agent-during-configuration) section of this tutorial.
Start with simple, single-condition triggers to ensure they work as expected before creating more complex ones.
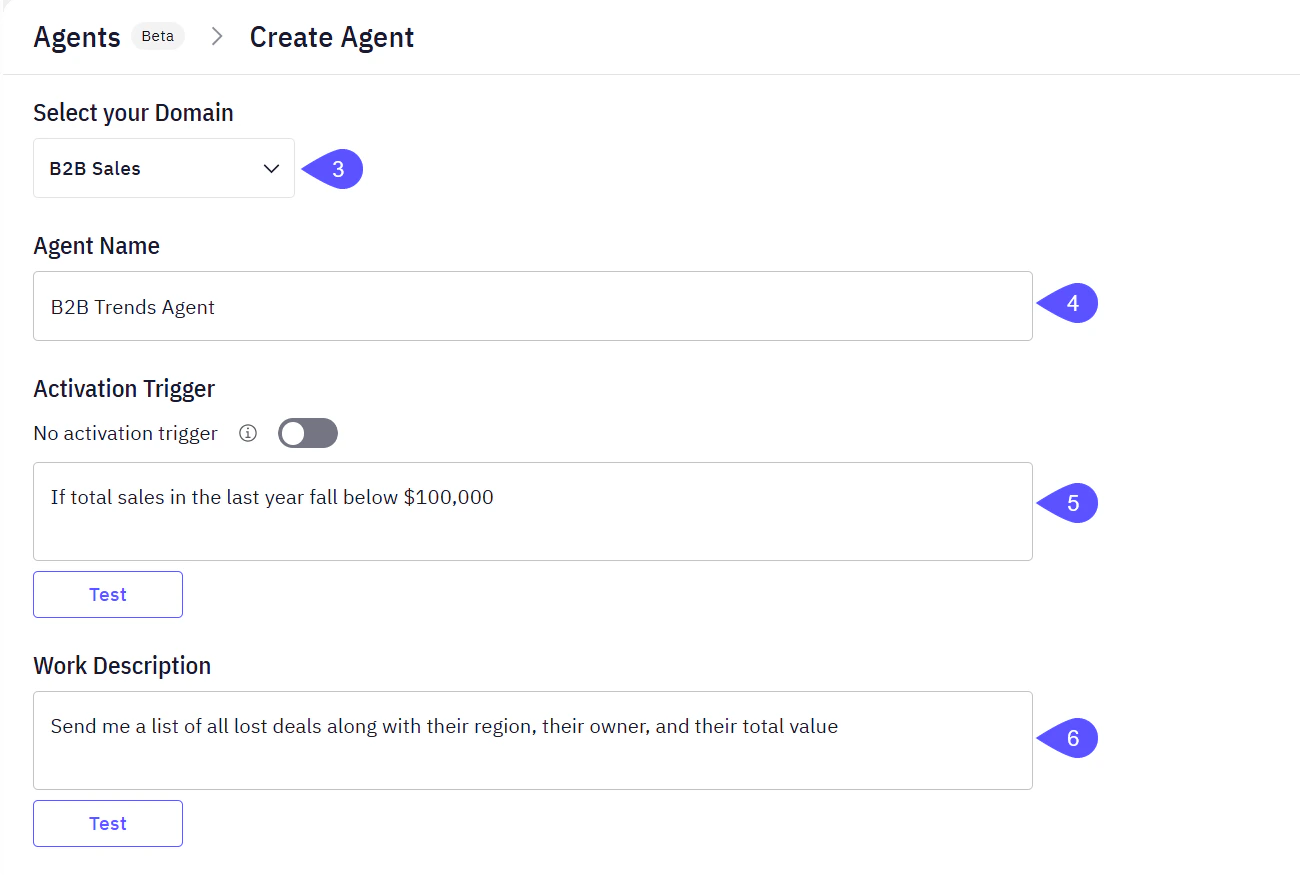 6. Define the **Work Description**. This is the task the Agent will perform if the trigger condition is met.
* In the work description text box, describe the analysis and action you want in natural language. For example: `Send me a list of all lost deals along with their region, their owner, and their total value`.
* Click **Test** to run the analysis and see a sample of the output. This allows you to preview the results that will be sent in the notification. Learn more in the [Test an Agent During Configuration](#test-an-agent-during-configuration) section of this tutorial.
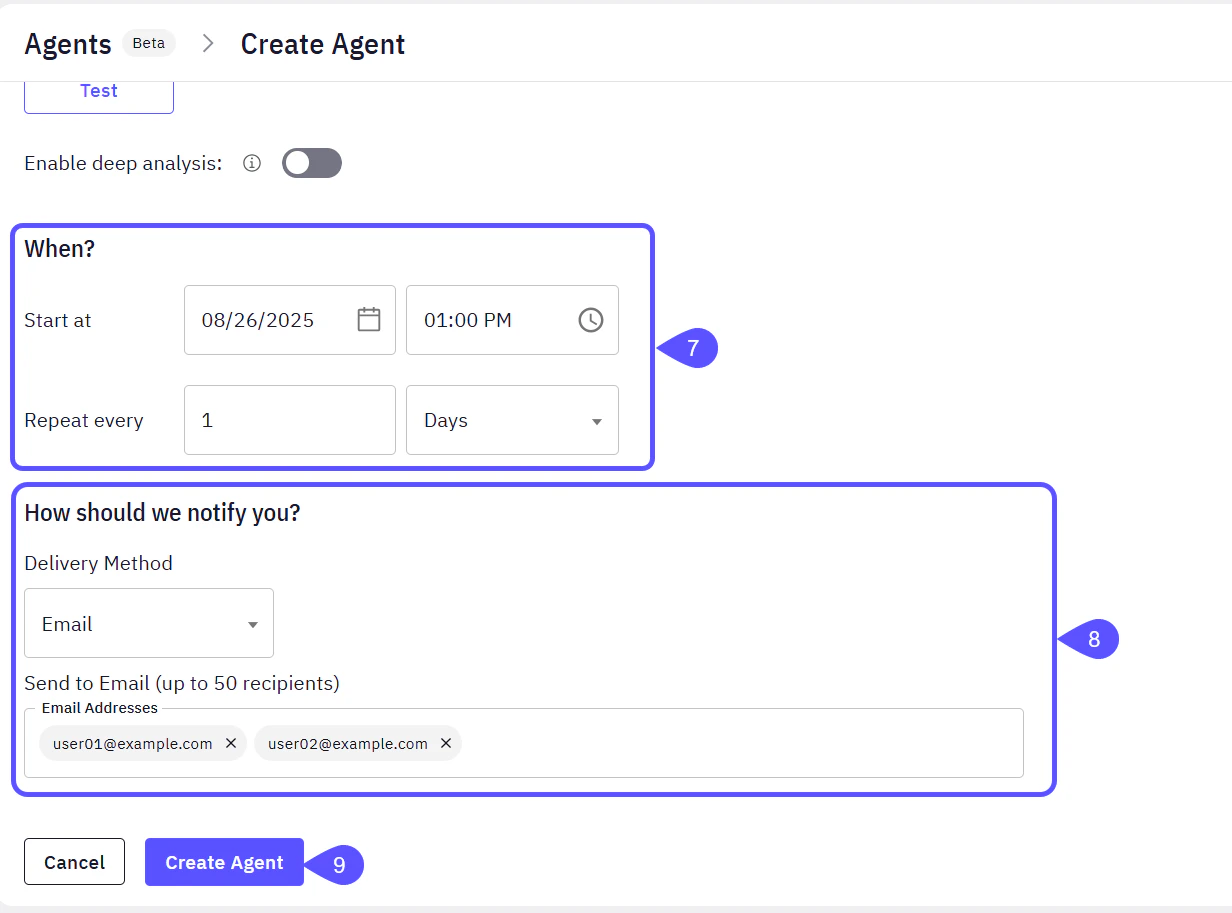
7. Set the **Schedule** for the Agent to run.
* Choose a start date and time.
* Define the frequency, such as every day or week.
8. Configure **Notifications** to define how you will receive the analysis results.
* **Email**: Select this option and enter one or more email addresses. The notification will contain charts and tables from the analysis.
* **Slack**: Select this option and specify the Slack channel names.
To use the Slack notification option, you must first have a Slack workspace connected. Read the [Connect to Slack](https://docs.askwisdom.ai/integrations/connect-to-slack) guide to learn how to do it.
9. Click **Create Agent** to save and activate it.
6. Define the **Work Description**. This is the task the Agent will perform if the trigger condition is met.
* In the work description text box, describe the analysis and action you want in natural language. For example: `Send me a list of all lost deals along with their region, their owner, and their total value`.
* Click **Test** to run the analysis and see a sample of the output. This allows you to preview the results that will be sent in the notification. Learn more in the [Test an Agent During Configuration](#test-an-agent-during-configuration) section of this tutorial.
7. Set the **Schedule** for the Agent to run.
* Choose a start date and time.
* Define the frequency, such as every day or week.
8. Configure **Notifications** to define how you will receive the analysis results.
* **Email**: Select this option and enter one or more email addresses. The notification will contain charts and tables from the analysis.
* **Slack**: Select this option and specify the Slack channel names.
To use the Slack notification option, you must first have a Slack workspace connected. Read the [Connect to Slack](https://docs.askwisdom.ai/integrations/connect-to-slack) guide to learn how to do it.
9. Click **Create Agent** to save and activate it.
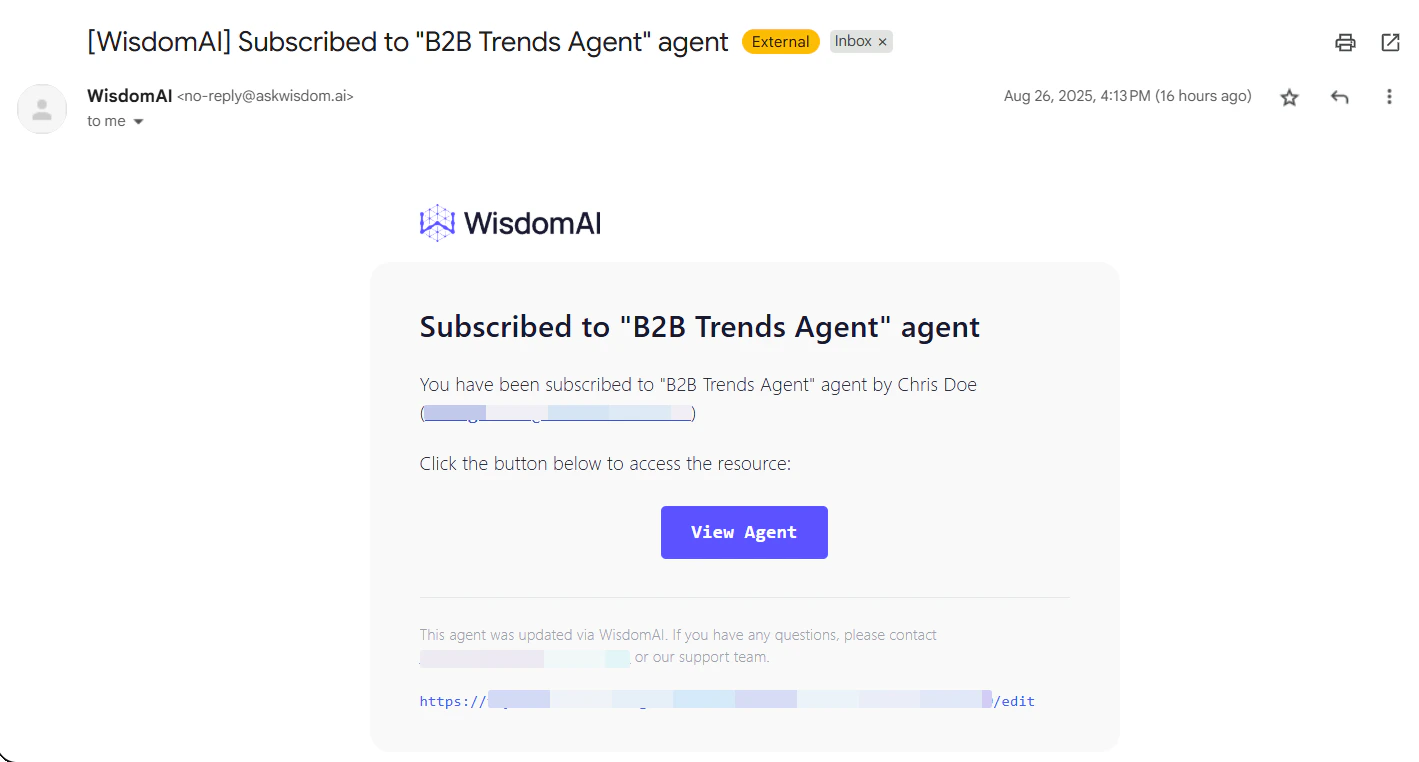
 10. You will receive a notification alerting you that you have been subscribed to that Agent. From there, you can directly access it using the **View Agent** button. This is what an email notification looks like:
 ## Test an Agent During Configuration
While creating or editing an Agent, you can test its two main components, the **Activation Trigger** and the **Work Description**, independently before saving. This helps you refine each part and ensure the Agent will behave as expected.
* **Test the Activation Trigger**: Below the trigger text box (this is only visible when the trigger is enabled), click **Test** to check if your condition is currently met based on the data. This is useful for verifying that your natural language criteria are written correctly and will activate when you expect them to. The test will show you if the trigger would fire and why.
* **Test the Work Description**: Below the work description text box, click **Test** to run the analysis and preview the output. This allows you to see a sample of the report that the Agent will generate, so you can adjust the description to get the exact information you need in your notifications.
## Test an Agent During Configuration
While creating or editing an Agent, you can test its two main components, the **Activation Trigger** and the **Work Description**, independently before saving. This helps you refine each part and ensure the Agent will behave as expected.
* **Test the Activation Trigger**: Below the trigger text box (this is only visible when the trigger is enabled), click **Test** to check if your condition is currently met based on the data. This is useful for verifying that your natural language criteria are written correctly and will activate when you expect them to. The test will show you if the trigger would fire and why.
* **Test the Work Description**: Below the work description text box, click **Test** to run the analysis and preview the output. This allows you to see a sample of the report that the Agent will generate, so you can adjust the description to get the exact information you need in your notifications.
 ## Next steps
Congratulations, you've created your first agent! Now you can try the following:
* [Manage Your Agents](https://docs.askwisdom.ai/advanced-features/agents/manage-agents)
* [Connect to Slack](https://docs.askwisdom.ai/integrations/connect-to-slack)
## Next steps
Congratulations, you've created your first agent! Now you can try the following:
* [Manage Your Agents](https://docs.askwisdom.ai/advanced-features/agents/manage-agents)
* [Connect to Slack](https://docs.askwisdom.ai/integrations/connect-to-slack)